[Explained] What is the CI-CD pipeline?
CI-CD is popular slang for continuous integration and continuous deployment of the latest code build onto the server.
Continuous Integration and Continuous Deployment is a setup wherein the code is deployed onto the servers without directly interacting with the servers either by the DevOps person or the developer themselves with almost zero downtime of the website.
Conventional Method
The conventional method of deployment goes something like this :
- The developer creates the build and pushes the code to a dedicated branch of their git repository.
- The DevOps (a.k.a server guy) person is notified of the new build to be deployed.
- The DevOps person ssh’s (login) into the server and reaches the directory from where the app is served.
- Makes a backup of the current version of the website and then either clone the repository and replace the old with new or git pull the new changes into the existing website repo itself.
- This way the website is deployed all by manual processes.
What’s wrong with this method?
A lot.
- Chances of failure or downtime of the website are extremely high as it is a manual process and can result in an ‘N’ number of issues or missed steps.
- Since the failure rate is high and is manual, you can only perform this activity during non-peak hours on your website. Thereby, not allowing you to swiftly update, patch and deploy newer changes.
- Let’s say you asked the DevOps person to make some hotfixes directly onto the server but forgot to do the same in your local codebase, the next time the code is deployed there is a high chance of git conflicts breaking your website.
- Some developers directly access the server via FTP tools such a FileZilla to deploy their files, though it offers real-time file-level updates but can be a great disaster in making as there is no tracking of changes and the file transfer could lead to file corruption or delayed packets transfer resulting into half file being uploaded and whatnot.
CI-CD method
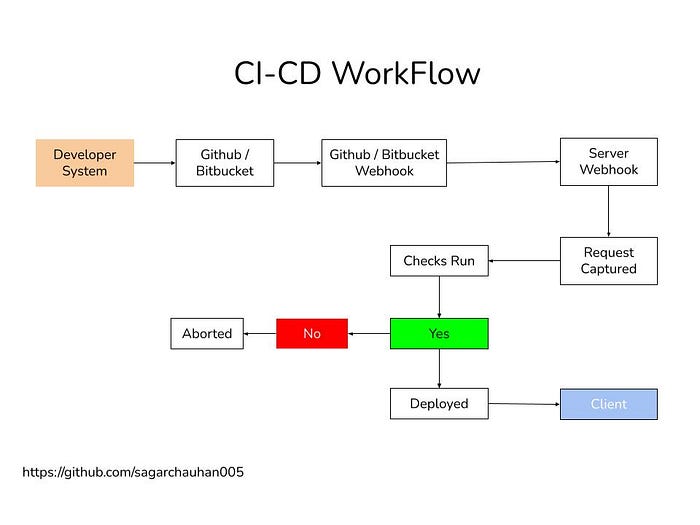
The CI-CD method of deployment goes like this :
- The developer creates the build and pushes the code to a dedicated branch of their git repository.
- Github / Bitbucket receives the event for the latest push to the repository.
- This event is then posted to a webhook on your webserver to a service listening for these changes in real-time.
- The service catches the event, matches the logic for deployment, runs any pre-deployment commands, and deploys the latest code in almost real-time with zero downtime. All fully-automated.
What advantage does CI-CD offer over Conventional methods?
A lot.
- Reduces the chances of failure to almost none as it is a completely automated process and will not skip any mandatory steps for deployment.
- Since the failure rate is almost none and is automated, you can perform this activity at any point in time without any worries. Thereby, providing you greater control of your website by allowing you to swiftly update, patch and deploy newer changes.
- It completely eliminates the dependency on the DevOps person and also ensures that all the checks (if in place) are run before the latest build is deployed.
- It takes away the server access from developers and reduces any possible interaction with it ensuring that no manual activity shall hamper the process in the longest of time.
- It ensures an almost 100% success rate of a successful deployment without the users getting to know any changes happening at all.
- Empowers developers to track their changes in case a build has to be revoked due to some logical errors being passed.
What’s under the hood?
This service is actually offered by many cloud service providers and is readily becoming an industry-standard but under the hood, it primarily works on the below-shown workflow.
Existing solutions [Paid]:
- AWS Codepipiline
- Github Actions
- Bitbucket Pipelines
Free solution:
If you are looking for a free solution that you can set up yourself on the server, you can visit my tool below.
The repository has detailed steps to set up the service and will do all the necessary installation on its own. Just follow the instructions and you shall be good to go.
And that’s a wrap. I hope you have found this guide useful. Thank you for reading. Let me know in the comments if you want me to cover any other topic and explain it to you.
That’s it.